Tuesday, January 1, 2013

A Very Merry Pink Christmas


Happy New Year to all!!

We had a great Christmas and I hope you did as well.  This year was fun as we tried to incorporate our new Pink Aluminum Christmas Tree into our decorating.  For Christmas, I typically decorate the main floor (living room and dining room) along with the family room on the lower level.  I do a 99% vintage Christmas with all the little 50's/60's Christmas items I have picked up over the last 15 years of collecting.  Most pieces are white, red and green so working in pink was a bit of a challenge. 

I decided to narrow my pink items to the living room where the pink tree is stationed.  I searched my various boxes of Christmas items and came up with a few pink Christmas items but not enough to decorate the whole living room, so I had my work cut out for me.  A search of ebay showed that vintage pink Christmas items existed in all sorts of condition and price ranges.  Also there seemed to be many folks that did some handcrafted items with vintage materials that were neat.

So a daily scouring of ebay, hunting local thrift and antique stores, a few new items, a few handcrafted items by others and myself and voila I had my pink Christmas.  I am very happy with the results and the fun I had creating it.


Here is the tree that started it all.  I posted on the blog back over the summer when I found this at the Elkhorn Flea Market.  A very exciting find!  We positioned the tree by the fireplace in the corner.  I found two kinds of pink plastic sputnik ornaments from an ebay seller.  He found these at a Nordstrom Display sale and had quite a few of them.  I did a combination of the spikey kind, the more rounded ones and then some round glass ornaments I found in a Rockford antique mall.

I could not find a pink tree skirt, so I bought a really cheap white one from Walmart and covered it with some pink satiny, shiny, sheer fabric from Joanns. The white one was thick enough to cover the stand and carpet while the pink fabric gave it a very elegant look. I basically just wrapped the fabric around the base as I am not someone that could sew a tree skirt together.


With the tree in the corner, I added some of my other pink finds.  My husband bought me the lighted pink wreath from treetopia as an early Christmas present.  The pink bullet planter was an old white one that was pretty beat up.  I cleaned it and spray painted the planter and legs with a pink spray paint made for plastic.  I let it dry and then gave it another coat.  The little black tips on the ends of the legs were intact so I just covered those with painters tape so that they would stay black.  Next year I hope to create some sort of little scene in the planter. 

On the end table on the lowest level, you can see a three light plastic candelabra.  The candelabra is the typical one you see at Christmas.  It was originally cream colored and a good find at a $1.  I got out my trusty spray paint again and painted it.  I added some silver leaves from a flower pick from the Dollar Store and I found some pink nightlight bulbs at Wal-Mart to finish it off. 


The plastic Merry Christmas sign was a find at a local thrift store for about 75 cents.  The Merry Christmas part was covered in gold glitter glue with much of it having fallen off over the years.  I scraped all the the old glitter glue off and then removed it from the flower and greenery.  I spray painted it with the same paint as the bullet planter.  I gave it several coats and then reattached it to the flower and greenery.  I had the pink shadow box so I filled it with some of my pinks finds.  The wire tree is something I have had forever and I added the pink ornaments to it.  The ones towards the top are clear ornaments with pink tinsel inside.  They were another find at the thrift store for about 1 dollar.


The upper ceramic Christmas tree was a new find for this year.  We found it at an antique mall in Beloit, WI.  It is white and gold with small pink birds.  It is lit a bit different than other ceramic trees.  It has holes on the underside of the "branches" that shine the light down on the birds.

The lower tree is more typical of ceramic trees.  I got this several years ago at an antique store in Beloit.  I had admired it on several trips and then one time it was 50% off so I scooped it up.  The ashtray next to the tree has a pink bow and blue bell decoration so it fits in nicely.

This great shadow box was an ebay find.  There is a gal on ebay that takes reproduction ornament boxes and creates these little scenes.  I saw another one of her creations and told her that if she created an all pink one I would bid on it.  She did and of course I was not the only one that liked it.  There were several bids but in the end it was meant to be in our pink Christmas.  She created it to hang on the wall with the small pink ornament hanging off the bottom.  I liked it too much to take a chance hanging it, so I took the ornament off the bottom and set it on the table.


I bought these little plastic trees from Joanns and spray painted them pink and set them around the room.


I wanted to keep the ornaments on the pink aluminum tree to the three basic styles I mentioned above.  So I had to figure out what to do with the other pink ornaments I had.  I pulled out my small white tree and turned it into a pink and white tree.  The bells are from ebay.  They are Shiny Bright but made of plastic.  The snowball type ornaments were ones I had and the small pink glass ornaments were ones I found at a flea market a few years back.  I really love this tree and feel like the white tree really helps the pink ornaments stand out.


I love old paper products.  The only issue is that I like to look at them but won't use them.  Who could use up these darling napkins?  A great ebay find from a seller near where I live.  Too bad I didn't run across these at the estate sale or thrift shop.  They are new old stock still in their plastic.


To add some kitschy fun, we picked this up at Menards.  The great thing is you can take the hat off and use it year round if you are so inclined.  


I ran across this pattern on some wrapping paper on ebay.  It is so cute, several pink poodles with candy canes and pink starbursts.  It was new so I thought maybe I could find it at one of the stores.  I could not find the wrapping paper but I did find these treat boxes at Marshalls.  They also had some gift tags in the same pattern.  Next year, I hope to create some ornaments from the gift tags. 


The pink stocking is from Target.  I bought 8 of them and next year hope to decorate them so each family member can have one with their name and some fun designs on them.  The pipe cleaner tree was made by me.  I got the idea from Kate on Retro Renovation. She made some out of silver pipe cleaners.  I took her idea and did mine in pink.  I used some jewelry pieces and ornament hooks to make the ornaments for the tree. 


Our big shadow box is across the room from the pink aluminum tree.  I filled it with pink ceramic angels, a pink feather angel and some pink vintage greeting cards. 


The metal ornament tree (in the foreground below) came from the same person that I bought the pink aluminum tree from.  It came with green glass ornaments.  I changed them out and added some pink ones I had.  The pink felt table runner is one of my favorite items.  It has lots of bead work and is so very cute.


 So that is the tale of our pink Christmas.  It was so much fun to find the various items and even to make some of them.  In case you are wondering, I did use up my can of pink spray paint!!  =-)

I hope 2013 is a great year for everyone.
Rebecca

Thursday, November 1, 2012

Kitchen Makeover . . . Howard Johnson style

 Our bathroom makeover has been put on hold due to starting our kitchen makeover.  We felt we needed to get that moving and done then finish the bathroom.

The kitchen is very small.  It is mostly 1963 original.  We don't have a lot of money to spend sprucing it up but we put together a plan to increase some functionality as well as give it a nice 60's vibe on a budget.  We plan to use the 60's Howard Johnson's color palate of aqua, white and orange.  Perhaps a bit daring but I just love that color combination and I think it really says "Welcome to our swinging sixties kitchen".


The functionality part of the plan needed to take into account that the counter space is very limited and that we needed to find a place for the microwave so that it does not take up valuable counter space. 

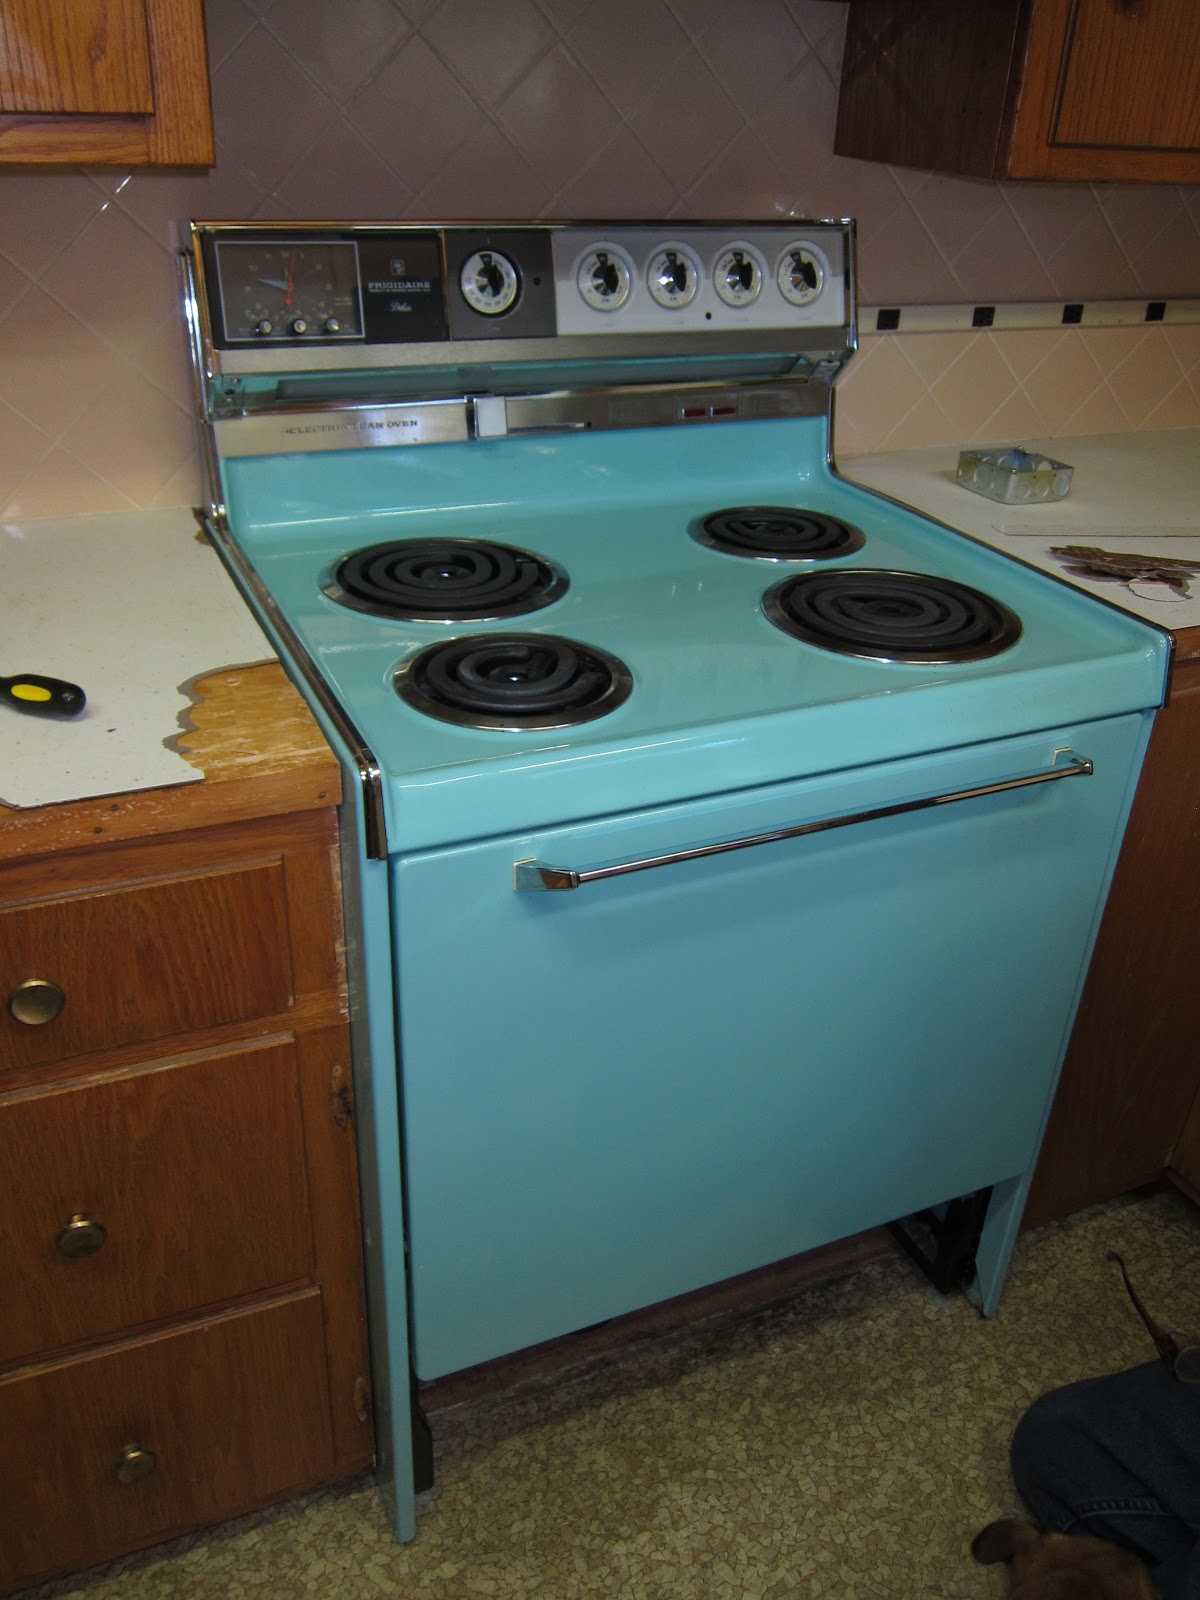
To do this, we decided to go from the current configuration of a separate wall oven and cooktop (in photo below the big open hole is where the wall oven was) to just a range.  We decided to cutout below the cooktop so we would have a place for the range.  We would then create a space in the old wall oven area for the microwave.  


Enter our local handyman, he cutout the area below the cooktop.


He then had the great idea of taking the cabinet doors from where he did the cutout and move them to enclose part of the open area where the wall oven was.  I just loved this idea and it helped us address our concern of having the microwave in this cavernous hole.  It also gave us more storage area and who doesn't like more storage.  He cut the cabinet doors to fit and then installed a shelf so that we can put the microwave in there.  I feel like adding the shelf and doors really finishes off the area.


Looks like our dog Peanut approves!


We did a dry run with our free aqua range to make sure it fit and worked.  The good news is that it fit and the cooktop works.  The bad news is that the lower element in the oven does not work. 
So I will need to see if I can find a replacement.


Up next, find out what happens when you try to remove 4x4 ceramic tiles and formica that were installed in 1963!  Let's just say it ain't pretty!

Rebecca


Wednesday, July 18, 2012

What we will do for the love of a vintage floor

I am a fan of vintage flooring, especially anything that has gold sparkles in it.  I really wish we could find new flooring that had the flair of flooring in the 1950's and 1960's.

We have a half bath that had shag carpeting.  The time had come to get rid of that shag carpeting.


Our initial plan was to remove the carpeting and lay a new floor.  We had picked out a great 60's style flooring that was featured on Retro Renovation from Karndean.  It is a blue mosaic vinyl tile that worked well with our oddly colored blue 4 x4 tile that was on all 4 walls of the bathroom.

The shag carpet came up and we found at least three layers of gunk on the floor.  Perhaps some carpet adhesive, deteriorated carpet pad and some other unidentified mastic.  We felt we needed to remove this gunk so that we could lay the tile down correctly.  We didn't want to put down a new sub floor because we didn't think we could cut the sub floor to match the curve in one of the walls in the bathroom.


Well the gunk on the floor seemed pretty determined to stay there.  We used all sorts of cleaners to try to get it up with little luck.  Finally, we just had to start scraping it with the edge of a shovel.  As you can imagine, this was quite discouraging and seemed like this project was going to take forever.  As we scraped and scraped, we started to uncover the original vinyl floor.  The more we saw of the original floor, the more we liked it.  It was a nice mix of colors, matching the toilet and sink as well as the blue in our wall tile.  Most exciting was the small areas of gold sparkle in the floor that pulled it all together.


Once we had a small section almost completely clear of the gunk, we looked to see if the scraping with the shovel was damaging the original floor.  Much to our surprise, it was not.  So we kept scraping and checking and we started to get the idea that maybe we could salvage this great floor.  It was a calculated risk.  We didn't know if all of the floor was in good shape so could we be spending all this time scraping and end up finding sections that were in really bad shape.  We decided to just take the risk.  We needed to get this stuff up to lay  a new floor anyway, so let's invest the time to see if we can get it up with hopefully a reward of the original vinyl in good shape.


 Even with the reward of knowing we might have an beautiful vintage floor when we were done, the scraping was tedious and frustrating.  We continued to try to find cleaners that would help move the process along, even one that said it was 100% guaranteed but no luck.  During this process, we were having our basement VCT floor, we had just installed, sealed.  The guy doing the sealing of the floor looked at our bathroom floor.  He said he has some professional stripper that he thought might help.  

He dropped off the stripper a couple days later.  It was called Crowbar.  Even with such a strong sounding name, we didn't have much hope but were willing to try it.  We picked an area by the toilet in case it did something bad to the vinyl.  We put it down, full strength and miracles of miracles, it worked!!  We had to apply several coats with each coat taking off a little more of the gunk but were were making progress and this was much easier than scraping.


As you can see in the side by side comparison, the new stripper has helped us make progress and we have renewed hope that we will get this project done in a timely manner.  If we are able to salvage the floor, I will post pictures of the finished floor when we get done.


I know it might have been easier to just cover the floor up, but for the love of vintage, very cool flooring, we were willing to go the extra mile or two to see if we could bring it back to life.

Rebecca


Tuesday, June 12, 2012

Vintage Travel Trailer Lighting . . . Improving on the Original


We own a 1968 Ken Craft Travel Trailer named Aqua Betty.  I wrote about her in my first entry on this blog.    She is very original and usually I am a stickler to staying with the original elements if we can.  But in Betty's case, I really did not like the original ceiling lights in the kitchen and eating areas.  I am not sure you could find more vanilla or plain lights if you tried.  Also, the bottom glass disc would not stay straight in the metal enclosure.


So we set out to find some vintage lights that would fit the space. We needed lights that were very shallow and that were wide enough to cover the current spot as they did not stain the wood under the lights.  We needed two matching lights and of course we wanted to find a good value!

We try to hit the Restore stores when we go out thrifting.  I always look at the lighting section to see if they have any interesting lights.  In January, we went to the Restore Store in Baraboo, WI and imagine my excitement when I ran across a very large, shallow round light in excellent vintage condition.  Now if there was only a matching one . . . oh wait, there is . . . oh darn, it is missing the screw top to keep the glass piece in place.  So I looked around hoping the little screw top just fell off and I was right, it was laying on the shelf below the light.  So we had a matching pair, in the size and depth we needed, wiring was in excellent shape and they were a great value at $5 a piece.

So this past weekend, after our first camping outing of the season, we installed our new lights.  I just love them and they fit perfect and are just the right depth and width.


Before -  light over kitchen sink


After -  light over kitchen sink


Before - light over eating area


After - light over eating area


I usually don't mess with the original design of vintage things, but this was a good lesson for me that there are times you can improve on the original and be very happy with the results.

Rebecca

Friday, May 25, 2012

My Dreamboat . . . 6 feet tall and pink all over


In my personal treasure hunting, there are two things I would categorize as Holy Grails.  One is a ceramic mermaid by California Potter Hedi Schoop.  The other is a Pink Aluminum Christmas Tree.  I have only seen the Pink Aluminum Tree in person once and that was at a museum.  I have seen them on ebay but always going for big bucks.  So imagine my excitement when I ran across one last weekend.

We went to the big flea market in Elkhorn, WI.  About 10 minutes in, we ran across a couple who was in the beginning stages of selling their aluminum Christmas tree collection.  They said they had collected over 100 trees over many years.  I was digging through the boxes of trees and saw a PINK branch.  I just about fainted.  So I pulled it out and it was in AWESOME shape.  I am not sure it was displayed more than once or twice.  Really it was in mint condition.  So we haggled a little on the price but I knew I just had to have it.  I put it together right after we got home and it is just gorgeous.  I love it!!


It is six feet tall with 54 branches.  I was worried that with that few branches it might not look full.  But because of how the holes in the post are drilled it sort of tapers up and I think it looks full.  It is just 6 feet with the top branch in so a bit shorter looking than I would expect 6 feet to look.  The branches are in fantastic condition.

The foil on the post is immaculate.   I am not crazy about the stand, I wish it had the O ring to attach to like other ones do.


 It has the original box as well.  It was sent to Kachina Displays in NM.  Funny to think they just mailed these around.  You can see the word PINK lightly on the same side of the box directly above the two small tree.


We also picked up some other great Aluminum Tree decorations.  This is a center piece we got.  It is gold and silver and the middle branch sticks straight up.  It came with the original box.  I have never seen one of these.


We also got a door hanger.  It is like a 3-D version you can hang on the wall or on your door.  It is silver and gold as well.


It looks like we are set to have an Atomic Christmas.   I can't wait for Christmas and of course now I am on the hunt for things to decorate the Pink Christmas tree with.

Happy Hunting!
Rebecca 

Wednesday, May 2, 2012

Have never seen one of these!

There was an estate sale in Madison last weekend. For some reason I didn't really get motivated to get there when it opened or near when it opened. I was out and about that afternoon and saw the Estate Sale sign and decided to go.

Within 2 minutes of being at the sale, I was kicking myself for not getting there sooner. I can only imagine what I missed based on what was left. This was a person that had things from the 50's and 60's that they seemed to just have packed away or kept very nice. Man . . . and the prices were very reasonable. The worst is when you see someone at the checkout buying things you would have scooped up. If I had only gotten there minutes earlier.


Despite my kicking myself all the way into next week, I continued to look around. Down in the basement I saw a box kind of tucked away. So as any good treasure hunter does, I peeked in. My heartbeat quickened and the excitement built as I see very small bullet planters. What could it be? Yikes it is a whole bunch of small bullet planters with a post and some metal rings. What in the world? (These kinds of finds are the ones that keep you coming back.)  I quickly counted the rings and the planters, 18 of each . . . SOLD!

Now my partner in crime was upstairs and I could not wait for him to come downstairs to see my bounty.
Though it was a bit heavy, I lugged that box around as I looked for more treasure and guarded it with my life. I was so excited I could barely stand it. He finally came downstairs (I am sure it was only 2-3 minutes but it felt like a lifetime) and I proudly showed him what I found. As expected, he was impressed. We headed to the check out and I just showed the checker the price on the box as I was sure if they saw what was inside they would charge me double maybe even triple and then we absconded with our find.


We of course had to run home and put it together immediately. Fingers crossed that all of the pieces were there. By golly they were and when we were done we were thrilled with our find. The best part was that there were two of them and we had the original box which we did not even realize.

So that is our big Totem Planter adventure. Nothing beats going out and finding such a cool item. I have never seen this type of planter. There was a hand written note on the box that said planter 1978. That seems late to me for such a planter but perhaps that is when they bought it or maybe when they packed it up. No matter, it is really very cool and will be a great piece to put out. I don't think I will put real plants in it as I don't want to damage the planters so maybe some fake plants will do the trick.

 A great find to keep me motivated to hit those sales and dig around in those basements!

 Rebecca

Monday, April 2, 2012

Love these houses

I keep my camera in my purse when I am out and about which allows me to snap shots of any cool houses I might run across. Perhaps I could be considered a vintage house stalker. Please don't report me!

Recently, I found two really neat houses.

I am a sucker for a brick or stone house. This house caught my eye as I approached it from the back. I just knew it was going to be cool in the front. From what I could tell the house is very deep and if you look through the front window you can see through to the back, which I think is just great. You get lots of great light in the rooms. I really like the alternate color scheme on the garage door.


I was driving down a main street and just caught the smallest glimpse of this house but knew I needed to turn around and go see it. This house has lots of wow and pop. I love the design, the colors, just everything about it. Even the garage door design is cool. I wonder if it is as cool inside.


Rebecca